
Using SXTune
ECU onboard logging
Configure the ECU's onboard logger, select the recorded channels, start or stop logging and download files over Wi-Fi.
Onboard logging configuration screen
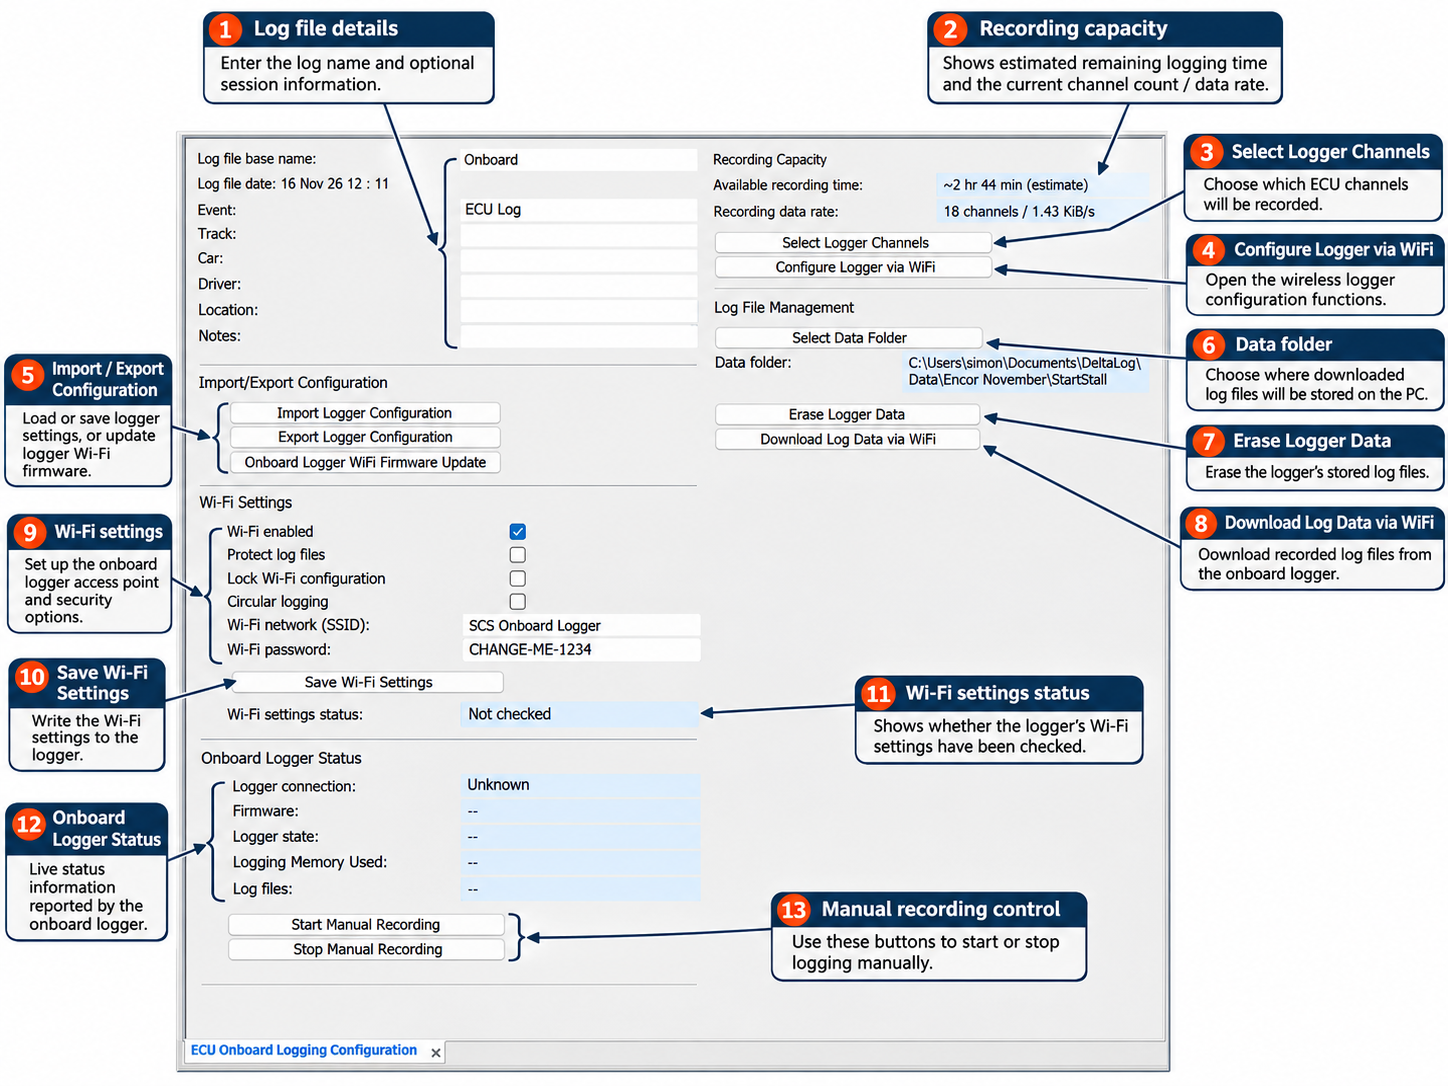
Open ECU Onboard Logging Configuration in SXTune while connected to an ECU with onboard logging support. The numbered labels identify the controls explained below. Select the image to open it at full size.
First-time setup
- Connect to the ECU with SXTune using the usual USB-CAN interface, and open ECU Onboard Logging Configuration.
- Enter the log details (1). Set a meaningful Log file base name. The optional Event, Track, Car, Driver, Location and Notes fields help identify the recording later.
- Choose channels (3). Select Select Logger Channels and choose the ECU data channels to record. Where automatic logging is required, configure its trigger channel and threshold in the same logger-channel dialog. Select only the channels needed for the test.
- Review recording capacity (2). SXTune displays the channel count, estimated data rate and available recording time. More channels generally increase the data rate and reduce the available duration.
- Set the Wi-Fi options (9). Enable Wi-Fi if you need wireless configuration or downloads, then set the logger network name (SSID) and password. Use Save Wi-Fi Settings (10) to write these settings.
- Choose the PC download folder (6). Click Select Data Folder and choose where downloaded log files should be stored.
Review the Wi-Fi settings status (11) and Onboard Logger Status (12) fields to confirm communication and the logger state. An Unknown or Not checked value means that status has not been confirmed; it does not by itself prove a hardware fault.
Start and stop a recording
To make a manual recording, select Start Manual Recording (13) on the onboard logging page. When the test is complete, select Stop Manual Recording. The recording is stored on the logger until it is downloaded or erased.
For an automatically triggered recording, first configure the required trigger channel and threshold in Select Logger Channels. Confirm the logger is configured correctly before running the test.
During setup or diagnosis, use Onboard Logger Status (12) to view the reported firmware, logger state, memory used and number of log files.
Download log data over Wi-Fi
- Make sure the logger is powered, Wi-Fi enabled (9), and the Wi-Fi settings have been saved.
- Choose the destination folder using Select Data Folder (6).
- Click Download Log Data via Wi-Fi (8) and follow the prompts. The PC must be able to connect to the logger's Wi-Fi network; if it does not connect automatically, select the logger SSID in Windows Wi-Fi.
- When the download finishes, open the selected data folder and load the recorded log in DeltaLog for analysis.
Settings and file management
| Control | Purpose |
|---|---|
| Import / Export Logger Configuration (5) | Load a saved logger configuration or export the configured settings for reuse. |
| Configure Logger via WiFi (4) | Open the logger's wireless configuration functions when the logger Wi-Fi connection is available. |
| Wi-Fi enabled (9) | Enable the logger's Wi-Fi interface for supported wireless functions. |
| Protect log files (9) | Log-file protection option. Check the selected state before attempting to clear files. |
| Lock Wi-Fi configuration (9) | Restricts changes to the logger's Wi-Fi settings. |
| Circular logging (9) | Enables the logger's circular recording mode where supported. Ensure older recordings have been downloaded before enabling a mode that may reuse storage. |
| Onboard Logger WiFi Firmware Update (5) | Updates the onboard logger's Wi-Fi firmware. This is separate from programming the main ECU firmware. |
| Save Wi-Fi Settings (10) | Applies the selected Wi-Fi and protection settings to the onboard logger. |
If a Wi-Fi download cannot connect
First confirm that the ECU/logger has power and Wi-Fi enabled is selected. Check the SSID and password saved in SXTune against the logger's network in Windows. If the PC is connected to another Wi-Fi network, switch to the logger network, then retry the download. If the logger status remains unavailable, verify the normal SXTune-to-ECU USB-CAN connection separately; Wi-Fi download and ECU calibration use different connections.
Related: Logging & replay for analysis in SXTune, and USB-CAN Interfaces for connection troubleshooting.